
Flows
Flows let you build automated chat conversations for your store. A flow is like a ready-made script your store follows when it talks to a customer — it can greet them, ask what they need, collect their details, look up an order, or hand the chat to an AI assistant, all on its own.
You build a flow by placing nodes (small building blocks, each doing one job) on a screen called the canvas, and joining them with arrows that decide what happens next. You don’t need to write any code — you simply drag, click, and connect.
Note: This guide covers the five building blocks you’ll use most: Question, Message, Collect Form, AI, and Tool. The editor has a few more (Branch, Email, SMS, Webhook, Extract, End) which work in a similar way. |
1. Before you begin
Opening the Flows section
Follow the steps given below to open the flow builder:
- Log in to your Mystore Seller Dashboard.
- Open the Flows section. You will see a list of your existing flows on the left.
- Click any flow to open it, or click Create New to start a fresh one.
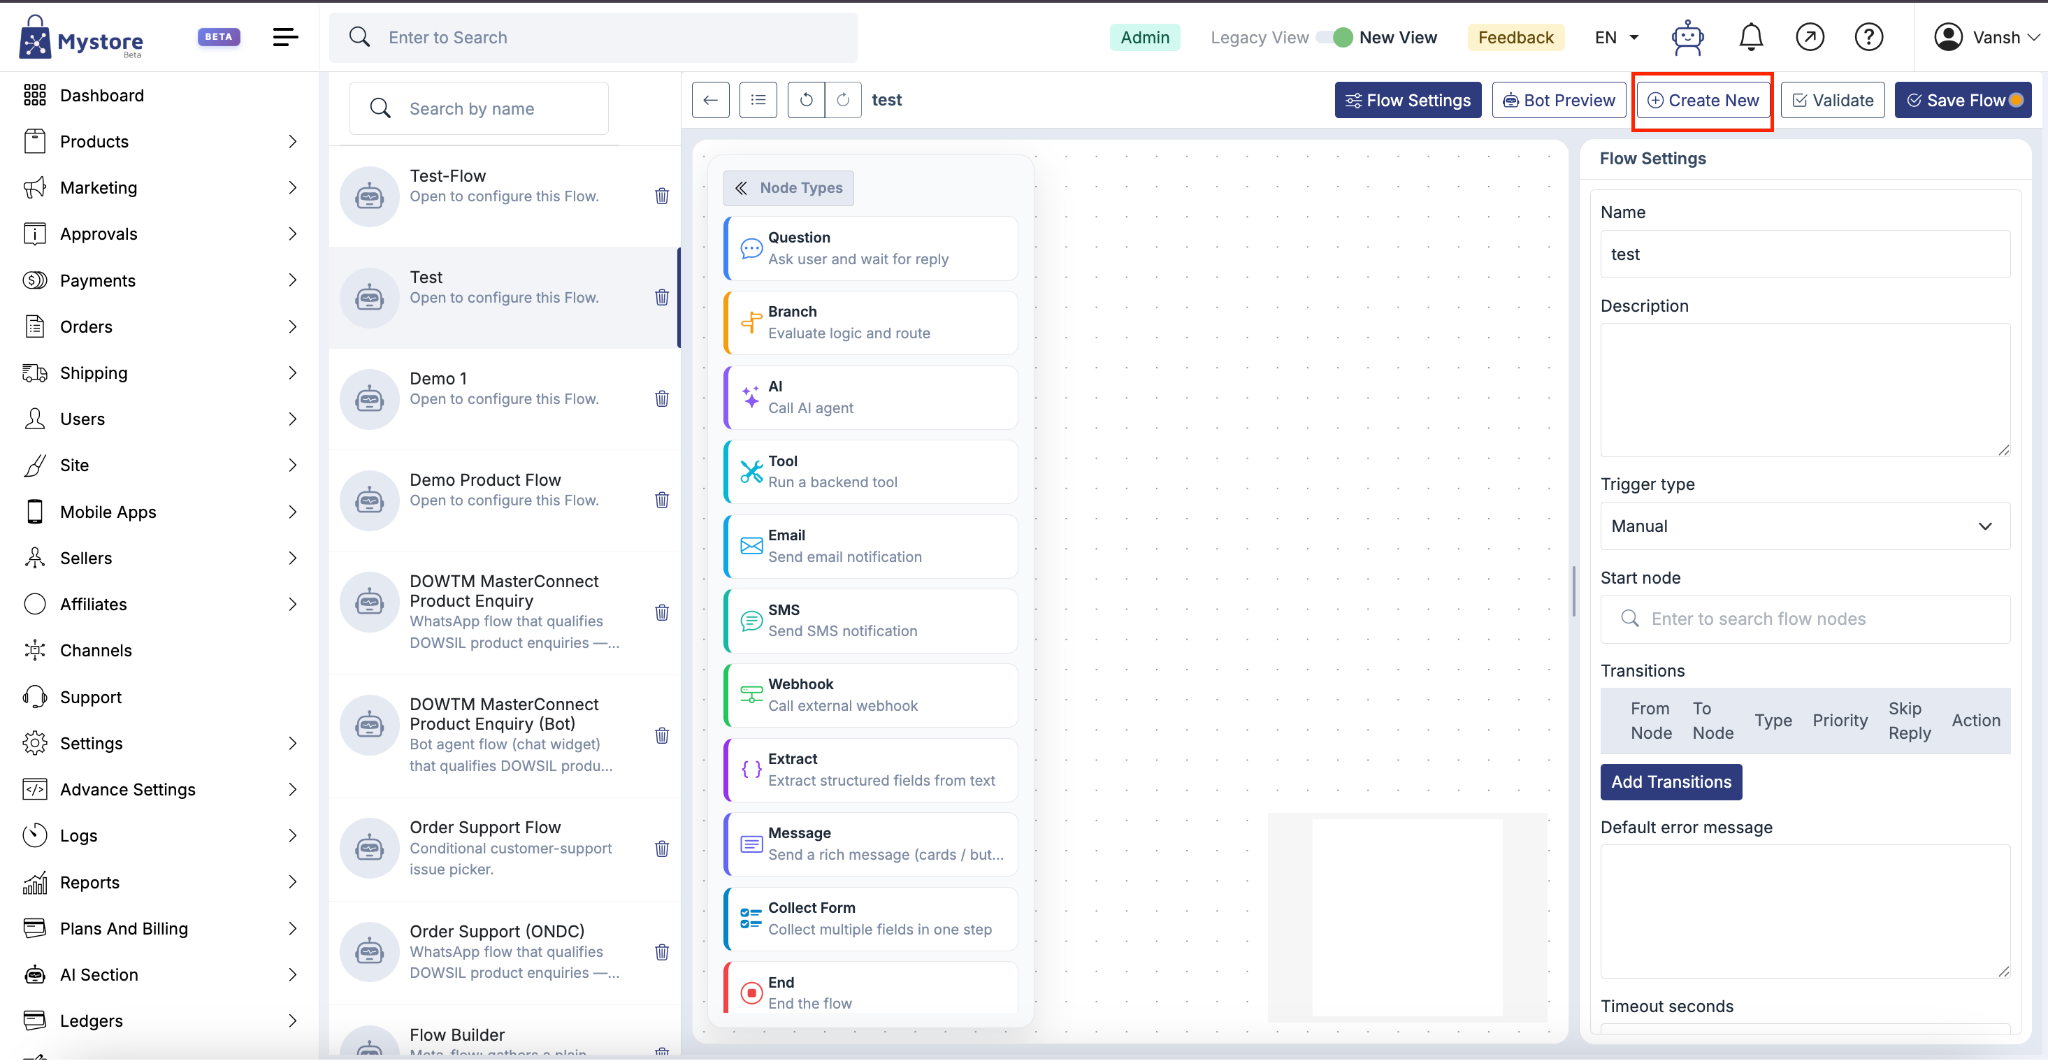
Understanding the screen
The flow builder has three main areas. Once you know these, everything else is easy.
- Node Types (left): The palette of building blocks. Drag any block from here onto the canvas to add it to your flow.
- Canvas (middle): Your work area. This is where you arrange nodes and join them with arrows to shape the conversation.
- Settings panel (right): Click a node to open its settings here. Click an empty part of the canvas to see the whole flow’s settings.
At the top of the screen you’ll find these buttons:
- Flow Settings: Name your flow, add a description, and set where the flow starts.
- Bot Preview: Opens a live chat so you can test your flow before customers use it.
- Create New: Starts a brand-new flow.
- Validate: Checks your flow for common mistakes (like missing connections).
- Save Flow: Saves your work. Nothing you do takes effect until you save.
2. The building blocks (nodes)
Each node does one simple job. The most important thing to understand is that some nodes wait for the customer to reply, while others do their job and move on by themselves.
Nodes that wait for the customer
- Question: Asks the customer something and shows tappable reply buttons, then waits for their answer. Best for menus and choices.
- Collect Form: Shows a small form to collect several details at once — such as name, email, and city — then waits for the customer to submit it.
Nodes that do their job and move on
- Message: Sends information to the customer — plain text, product cards, a carousel, or buttons. It does not ask anything.
- AI: Hands the chat to an AI assistant you’ve set up, which writes a reply for you.
- Tool: Runs a behind-the-scenes action, such as checking an order status or saving a customer’s details.
Quick comparison
Node | What it does | Waits for reply? | Best for |
|---|---|---|---|
Question | Asks and offers choices | Yes | Menus & choices |
Message | Tells or shows information | No | Telling, not asking |
Collect Form | Gathers several fields at once | Yes | Multi-field capture |
AI | Generates a natural reply | No | Conversational answers |
Tool | Runs a backend action/lookup | No | Actions & lookups |
Tip: Chain a few Message nodes right before a Question. The customer sees your intro text and the choices together in one natural reply. |
3. Create your first flow
Here is the simple routine you’ll repeat for every flow. Follow the steps in order:
- Open the Flows section and click Create New.
- Click Flow Settings and give your flow a clear Name and short Description.
- From Node Types on the left, drag a block (for example, Message) onto the canvas.
- Click the node to open its settings on the right, and fill in the details.
- Add more nodes and join them with arrows to set the order of the conversation.
- In Flow Settings, choose the Start node — the block the conversation begins with.
- Click Save Flow, then Validate to check for mistakes.
- Click Bot Preview to test the flow yourself before going live.
4. Setting up each node
Every node shares a few common settings at the top of its panel:
- Name: A label for the node so you can recognise it on the canvas (e.g. “welcome message”).
- Node type: What kind of block this is. You can change it from the dropdown.
- Is start node: Turn this on if the conversation should begin here.
- Is end node: Turn this on if the conversation should finish here.
Question node
Use a Question node to ask the customer something and give them buttons to choose from.
- In the Text box, type the question the customer will see.
- Click Add Options to add each choice. Give every choice a Label (what the customer sees) and a Value (what gets saved).
- Draw an arrow from the question to the node that should handle each answer.
You can personalise the question using {{variable}} — for example, Hi {{name}}, what do you need?
Note: The customer’s reply is remembered as last_user_input_text, so later nodes can use it. |
Message node
Use a Message node when you want to tell the customer something rather than ask.
- Pick a Message type: plain text, a card, a carousel, or buttons.
- Fill in the content — the message text, or the card/button details.
- Draw one arrow to whatever comes next.
Important: Buttons on a Message node are for looks and links only — they do not change where the flow goes. If you need the customer’s choice to change the path, use a Question node instead. |
Collect Form node
Use a Collect Form node to gather several details in one step, instead of asking many separate questions.
- Write the intro text shown above the form.
- Choose to build fields here, or reuse a saved form.
- Add each field with a name, label, type (text, number, yes/no, email, or date), and mark it required if needed.
- Set the Submit button label.
After the form is submitted, you can use each answer later, for example {{email}} or {{form_data.city}}.
AI node
Use an AI node to let an AI assistant write a reply inside your flow.
- Choose the AI agent that should handle this step (agents are set up in the AI section of your dashboard).
- Optionally type an instruction to guide the reply.
- Set an error behaviour in case the AI step fails — end the flow, or go to another node.
The AI’s reply is saved as {{ai_response}}, so you can show it in a Message or branch on what it said.
Tool node
Use a Tool node to run a behind-the-scenes action, such as checking an order or saving a lead.
- Pick the tool to run from the list.
- Make sure the details the tool needs were already collected by an earlier Question or Form.
- Set an error behaviour for when the tool fails.
- Usually, draw an arrow to a Message node that shows the result.
The tool’s result is saved as {{tool_output}}. For example: Your order status is {{tool_output.status}}.
5. Connecting nodes with arrows
Arrows (also called transitions) join your nodes and decide the order of the conversation. To connect two nodes, drag from the handle on the right of one node to the left of the next.
When a node finishes, the flow checks its arrows in order and follows the first one that fits:
- Direct (DIR): Always taken — a simple “go to the next node”.
- Conditional (COND): Taken only when a rule matches, e.g. the customer chose a particular option. Configure the transition Type, Priority, Skip Reply, and Conditions as required.
- Fallback (FB): A safety net — taken when nothing else matched.
Tip: When a Question can lead to several answers, give each arrow a condition, and always add one Fallback arrow so an unexpected reply still has somewhere to go. |
6. Flow Settings explained
Click Flow Settings (or click an empty part of the canvas) to open the settings for the whole flow.
- Name: The name of your flow.
- Description: A short note on what the flow does — helpful for your team.
- Trigger type: How the flow starts (for example, Manual).
- Start node: The block the conversation begins with. Search and select it here.
- Transitions: A table listing every arrow in the flow — From node, To node, Type, and Priority — so you can review the whole path in one place.
7. Test your flow and go live
- Click Save Flow to save your latest changes.
- Click Validate to catch common issues, such as a missing start node or an unconnected block.
- Click Bot Preview and chat through the flow yourself. The nodes and arrows that run light up green, so you can see the exact path.
- Fix anything that looks wrong, save again, and re-test.
Note: AI and Tool nodes are not actually run during a passive preview greeting — only on a real chat — so testing never spends real AI calls or triggers real actions. |
8. A simple example flow
Here is a common flow that captures a product enquiry and passes it to your sales team. It uses all five building blocks:
- Message — Greet the customer: “Hi! Welcome to our store 👋”
- Question — Ask “What would you like to do?” with choices Product enquiry and Track order.
- Collect Form — For a product enquiry, collect name, city, product, and quantity.
- Tool — Save the enquiry as a lead for the sales team.
- Message — Confirm: “Thanks {{name}}, our team will contact you shortly.”
9. Things to keep in mind
- Nothing is live until you Save. Adding, editing, connecting, or deleting nodes only takes effect after you press Save Flow.
- Always test in Bot Preview before sharing a flow with customers.
- Every flow needs a start and an end. Set the start in Flow Settings, and finish with an End node.
- Give conditional arrows real conditions, and add a Fallback so unexpected replies aren’t lost.
- Remember the pause. Only Question and Collect Form wait for the customer. Message, AI, and Tool run and move on.
- Details carry through the chat. Anything a node saves can be reused later with the {{...}} format.