
Location-based Inventory mapping
Manage inventory across multiple stores, warehouses, and fulfilment locations with Mystore
Location-Based Inventory helps you manage stock separately across different physical locations. Whether you operate multiple stores, warehouses, branches, or fulfilment centres, you can maintain location-wise inventory and ensure that customers see the right availability.
What is Location-Based Inventory?
With Location-Based Inventory, you can:
- Maintain separate inventory for each location
- Add multiple warehouses, stores, or fulfilment locations
- Link products to specific locations
- Control how much stock is available at each location
- Fulfil orders based on available inventory at a location
Example
Suppose you have three locations:
| Location | Product A | Product B |
|---|---|---|
| Mumbai Warehouse | 100 | 50 |
| Delhi Warehouse | 60 | 30 |
| Bengaluru Store | 25 | 10 |
Mystore maintains the inventory separately for each location. This allows you to know exactly how much stock is available at each location instead of maintaining one combined inventory figure.
Location Quantity Limit
The maximum number of active locations that you can have depends on your store's subscription plan. Each subscription plan has the following active location limits:
- Freemium: 1 location
- Basic: 5 locations
- Business: 10 locations
- Enterprise: 25 locations
Before You Begin
Before using Location-Based Inventory, make sure that:
- Your locations have been created in Mystore. Click here to add Store Locations
- The required products have been added to your catalog
- Products are linked/activated for the relevant locations
- Inventory quantities have been added for those products at each location
Adding Products to a New Location
You need to link the products that you want to manage or sell from that location.
Step 1: Navigate to Linked Products
- Log in to Mystore Seller dashboard
- Go to: Products → Linked Products
- Click on Add or edit
Step 2: Enter Basic Product Details
Fill in details:
- Product Name
- Inventory Quantity
- Enable Publish (if ready to go live)
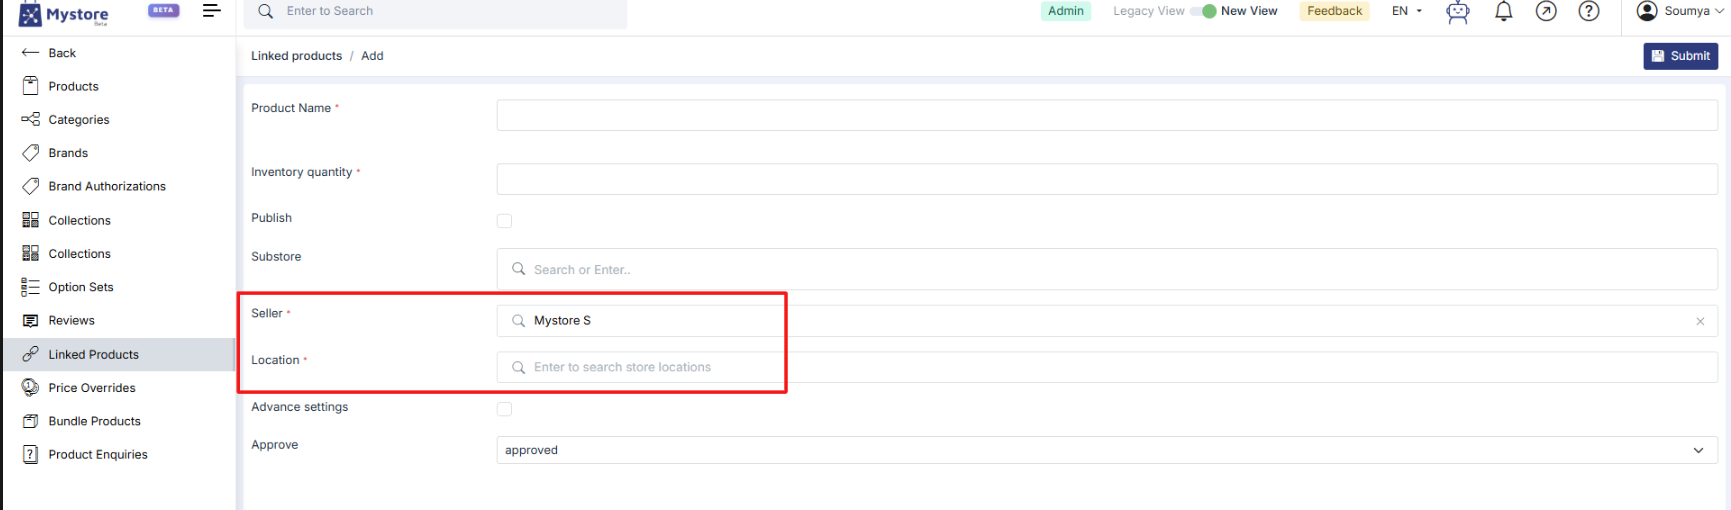
Step 3: Select Inventory Location (Mandatory)
- In the Location field
- Search and select the store/warehouse location. Only locations mapped to the selected seller will appear here
Step 4: Configure Additional Settings (Optional)
- Substore (if applicable)
- Advanced Settings:
Enable Advanced Settings to control purchase limits and order policies:
- Min Limit → Minimum quantity a customer must buy
- Max Limit → Maximum quantity allowed per order
- Cancelable → Choose if the product can be canceled (Yes / No / Default)
- Returnable → Choose if the product can be returned (Yes / No / Default)
If left as default, system-level settings will apply.
- Approval status (default: Approved)
Step 5: Save the Product
- Click on Submit (top right)
Note: A single product can be linked to multiple locations.
Common Use Cases
1. Multiple Warehouses
A merchant operates warehouses in Mumbai, Delhi and Bengaluru. Each warehouse maintains its own inventory, allowing the merchant to fulfil orders from the appropriate location.
2. Retail + Online Store
A merchant has physical stores as well as an online store. Inventory can be maintained separately for each physical location while online orders are fulfilled from eligible locations.
3. Regional Inventory
A merchant maintains stock region-wise. For example:
- North: Delhi
- West: Mumbai
- South: Bengaluru
This helps the business maintain better visibility of regional stock.
4. Distributed Fulfilment
A merchant maintains stock at multiple fulfilment centres and wants to use available inventory based on the fulfilment location.