Linked Products
Linked products allows you to specify different pricing of the same product. This helps in upselling or offering customers alternative options on the product page.
1.Accessing the Linked Products Section
- Log in to your Mystore seller dashboard.
- In the left-hand menu, go to Products > Linked Products.
- You’ll see a list of all linked products that have been created.
- Next to each linked product, you can use the Action menu to:
- Edit – make changes to the linked product details.
- Delete – remove the linked product from the list.
- Duplicate – create a copy of an existing linked product.
- Publish – make it visible to customers.
- View Logs – check activity history related to the linked product.
- Next to each linked product, you can use the Action menu to:
2. Add a New Linked Product

- Click the “Add New” button at the top-right corner of the screen.
- You will be taken to a form.
- Fill in the Linked Product Form
| Field | Explanation |
|---|---|
| Product Name (Required) | Enter the name of the linked product you want to create. |
| Inventory Quantity (Required) | Enter the total available stock for this product. |
| Publish | Tick this box if you want the linked product to be visible on the storefront immediately. |
| Advance Settings | Enable this if you want to set purchase limits or manage product cancellation/return policies. |
| Min Limit to Buy this Product | Set the minimum quantity a customer must purchase. Leave blank if there’s no limit. |
| Max Limit to Buy this Product | Set the maximum quantity a customer can purchase. Leave blank if there’s no limit. |
| Cancellable | Select Yes if customers can cancel the product after purchase, No if they cannot, or leave as Default to follow your store’s global cancellation policy. |
| Returnable | Select Yes if customers can return the product, No if they cannot, or leave as Default to follow your store’s global return policy. |
3. Import Linked Products in Bulk
If you want to update or add multiple linked products at once, you can use the bulk import feature. This saves time compared to adding products one by one.
Step 1: Open the Import Option
- At the top-right corner, click on import.

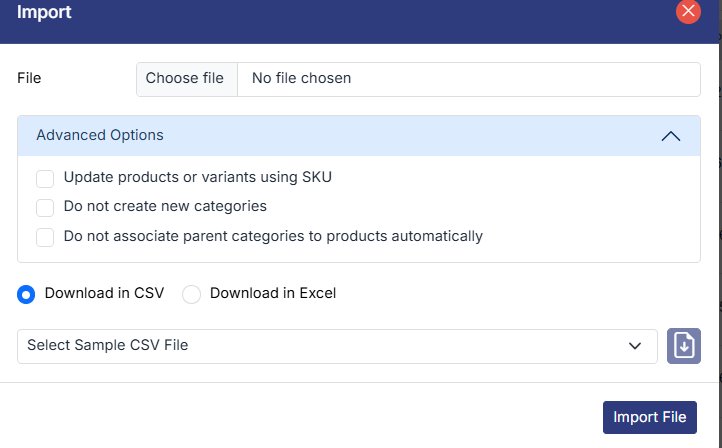
An Import popup will appear.

Step 2: Prepare the CSV File
- In the popup, you will see an option to Download Sample CSV File.
- Download this file to understand the correct format for uploading linked products.
- Update the CSV file with your product data, following the sample structure.
- Example: inventory_quantity, location_availability_mode, publish, substore[], import_by_sku, product_name, sku
- Save the updated file on your computer.
Step 3: Upload and Import
- In the Import popup, click Choose File.
- Select your updated CSV file from your computer.
- Click the Import File button.
- The system will process the file and import all linked products in bulk.
4. Save the Linked Product
- Once all fields are filled, click the “Submit” button at the top-right corner.
- Your new linked product will now appear in the list and can be managed from the action menu.
Was this page helpful?
